


What Would A DIY Net Metering System Part Cost?
This is a list of materials and a cost without installation for a 10 kWh panel system. This is provided for a guideline only, and each customer's needs are different and each house is a custom design. We can supply a specific package of parts to suit your home so that you can DIY and save the cost of installation. This was last updated in Nov 2020.
You will require an approval from your local hydro utility. It is issued at no charge, but only if the hydro grid in your area is able to accept all the extra power that you may generate. Do NOT spend money on parts until you have this approval.
 A Gable roof
This example package is for the following application:
- Rooftop mounted on a bungalow with a basic gable roof and asphalt shingles, no dormers, roof trusses 24" centers, the underside of roof is not accessible, (assume Cathedral ceiling), therefore deluxe flashing of all roof penetrations)
- The array of panels are in portrait orientation 2 rows of 13 panels each. This is suitable for a bungalow with a gable roof with one surface facing south. The solar array is 43.9' wide and 13.31' high. This requires at least 600 ft2 of roof area without any obstacles. The house therefore must be at least
- 45' wide to fit this sample configuration.
- The roof shingles are in near perfect condition and are expected to last another 20 years minimum.
- located on an un-shaded roof facing due south
- Roof slope 3/12 pitch or greater
- 10kWh of solar panels (26)
- Ontario Code compliant design including rapid shutdown requirements and rodent proofing.
- Uses a central inverter for lowest cost.
- The parts that we supply are all of the solar parts on the roof up to and including the Soladeck junction box and roof penetration.
| QTY | Manufacturer | Item description | Cost | |
1 |
|
|||
26 |
400W panels | |||
1 |
Fronius |
|
||
1 |
Fronius | Automatic Rapid shutdown for 2 DC strings |
|
|
1 |
Soladeck | combiner/junction box and roof penetration flashing |
|
|
1 |
Parts total | $12,681.66 | ||
1 |
Shipping, with lift gate delivery (estimate only) | $394.96 | ||
1 |
HST | $1699.96 |
||
1 |
Total | $14,776.58 |
This is the lowest cost approach for an un shaded site and the easiest and least costly type of roof installation. If there is an issue with shading, or due to personal preference the same number of panels can be used with micro inverters for about the same cost. Today's micro inverters can't deliver all of the output of the panels at solar noon since they have a steady state maximum output of 7.1 kW. With extra panels and extra inverters which is permitted by Hydro One a micro inverter based system can drive 10kW onto the grid. This requires more roof area and more money than the string inverter approach.
If you shingles are not in perfect condition then re shingle with the best lifetime shingles you can get. If you ignore this advice, then you will find out it is very expensive in time or labour to remove the solar system to permit re shingling the roof and then reinstall it!
If the house has a flat ceiling and the underside of the roof is fully accessible from the attic then some money could be saved by using basic L foot mounting without extra flashing. This could lower the cost about $500.
This further assumes the inverter is mounted inside the house usually in the basement.
Some additional parts are required that can be purchased at a hardware store or construction big box store. We do not supply any of these items. This list itemizes the parts from the conduit knock out inside the Soladeck to the Main circuit panel connection. It will include:
- 4 * #10 wires from rapid shutdown output to inverter DC inputs.
- One #6 ground wire from lay in ground lugs on mounting rails to the inverter and then to the A/C disconnect switch and to the main load center panel. The #6 wire must be a green insulated wire.
- Conduit for the above wiring run. The conduit can only be 40% full. 3/4" conduit minimum, 1" recommended for easier pulling. Use stranded wires rather than solid for easier pulling. Use 90C wire rated for use in conduits.
- 2 hole conduit clamps sized to match conduit size.
- #6 3 wire plus ground indoor cable from inverter AC output to outside shutoff switch. Then from switch to main load center. Only 2 conductors are used. This run is not required to be inside conduit when it is inside the house.
- Conduit for the portion of #6 wire that goes outside and then back inside to main panel circuit breaker
- Outdoor safety A/C disconnect switch located near your meter
- 60A dual breaker for your electrical panel
- In addition you will need a building permit
- An ESA wiring permit for the project
- 2 Packages of 100 black UV resistant 11" tie-wraps
- Container of anti-seize for stainless steel threads
- Ground plate or ground rod
- Your local Hydro supplies a bi-directional smart meter once it passes ESA inspection.
For an alternative approach using micro inverters the following system can be supplied:
| QTY | Manufacturer | Item Description | Cost | |
1 |
|
|||
26 |
400W panels | |||
13 |
APSystems | Dual micro inverter 548VA for 2 panels with AFCI | ||
14 |
APSystems | # of taps on Y cable for microinverters | ||
1 |
Soladeck | combiner/junction box and roof penetration flashing | ||
1 |
Parts total | $12,605.02 |
||
1 |
Shipping, with lift gate delivery (estimate only) | $394.96 | ||
1 |
HST | $1689.99 | ||
1 |
Total | $14,689.97 |
A higher cost 295VA single panel micro inverter is available to deliver about 7.67 kW to the grid under maximum solar illumination.
Since in this configuration the micro inverters have AFCI, so rodent protection is not required under Ontario ESA rule Rule 64-210 5.
Some additional parts are required that can be purchased at a hardware store or construction big box store. We do not supply any of these items. This list is a little different to the first one for string inverters. It will include:
- 4 * #10 stranded, not solid wire from the Solardeck to connect the ends of 2 trunk cables to AC combiner box circuit breakers output terminal (the combiner is used backwards) This is not permitted to be a cable. The Soladeck acts as the main junction box as well as a roof penetration flashing.
- One #6 ground from lay in ground lugs on mounting rails to the AC combiner and then to the A/C disconnect switch and to the main load center panel. The #6 wire must be a green insulated wire. It should be one continuous length.
- Conduit for the above wiring run. The conduit can only be 40% full. 3/4" conduit minimum, 1" recommended for easier pulling. Use stranded wires rather than solid for easier pulling. Use 90C wire rated for use in conduits.
- 2 hole conduit clamps sized to match conduit size.
- Load center used backwards as an AC combiner with 2 pairs of 15 or 20A breakers.
- #6 3 wire plus ground indoor cable from combiner AC output (Main input lugs) to outside shutoff switch. Then from switch to main load center. Only 2 conductors are used. This run is not required to be inside conduit when it is inside the house.
- Conduit for portion of #6 wire that goes outside and then back inside to main panel breaker
- Outdoor safety A/C disconnect switch located near your meter
- 60A dual breaker for your electrical panel
- In addition you will need a building permit
- An ESA wiring permit for the project
- 2 Packages of 100 black UV resistant 11" tie-wraps
- Container of anti-seize for stainless steel
- Ground plate or ground rod
Factors that diminish your electricity production
- Roof slope is less than 30 degrees
- Roof faces other than due south
- Shade from trees or other parts of this or a nearby building
- Snow accumulation in winter. (You just have to live with this unless you have a ground mounted system.)
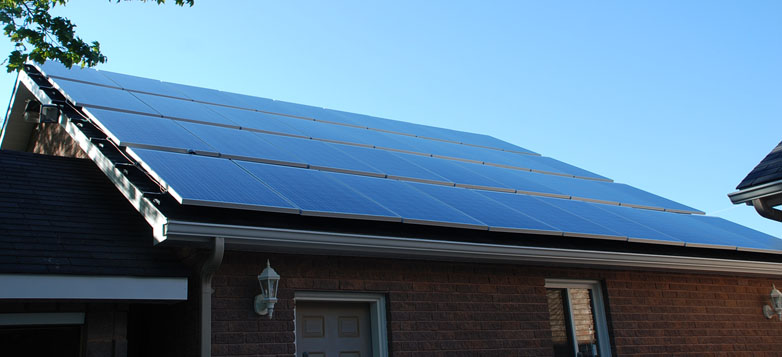
About the picture. This is a microFIT system installed in the very early days of that program and uses a home made racking system instead of aluminum racking channels that are used today. It happens to be a large garage with a gable roof and a lean to utility building on the left. The only difference you may spot is the spacing between adjacent rows of panels is not the uniform 1" that is normally used today. I provided some modest assistance in the erection of this system.